Pork Chop Marinade

Stop making boring pork chops. You NEED this pork chop marinade, with soy sauce, brown sugar, garlic, Dijon, and citrus! It all comes together for the most juicy, tender, flavor-packed pork chop you’ve ever had!

4 pork chops marinating in a Ziploc bag.

The Secrets to Juicy, Flavor-Packed Pork Chops

  • The Secret Ingredient? Orange juice! It isn’t just for flavor; it’s acidity that tenderizes the meat, giving you melt in your mouth juicy pork chops.
  • No More Dry Pork Chops: This marinade locks in moisture so every chop turns out tender and flavorful, no matter how you cook it.
  • Versatile & Family-Friendly: Not just for pork! Use it on chicken or veggies for easy, delicious dinners everyone will love.

Pork Chop Marinade Ingredients

Overhead shot of labeled ingredients.
  • Soy sauce as brine: Soy sauce adds savory umami and helps brine the meat. Substitute with tamari (gluten free) or coconut aminos (soy free) if needed.
  • Citrus: Citrus juice not only brightens flavor but also tenderizes the meat. Orange juice is preferred, but pineapple or lemon juice works.
  • Pork chops: The marinade works for about 4 pork chops. Both bone-in and boneless cuts are great! You can choose your favorite.

How to Make Pork Chop Marinade

It’s so simple, all you need to do is mix a few pantry staples together! You’ll never buy store bought marinade again. Other must try marinades include my steak, chicken, and salmon marinades.

  1. Combine Ingredients: In a medium bowl, whisk together soy sauce, orange juice, brown sugar, minced garlic, Dijon mustard, and black pepper. *Set aside a little marinade before adding raw pork. Then, brush it over the pork chops in the last few minutes of cooking for extra flavor and juiciness.
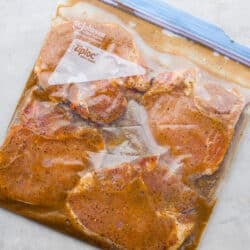
  2. Marinate: Pour your marinade into a sealable plastic bag, then add the pork chops and allow them to marinate for at least an hour. *Marinating for a few hours or even overnight will make the pork chops extra tender and flavorful. Cook your pork chops with your preferred method. You can grill, air fry, or cook them on the stovetop. Discard any used marinade.

Alyssa’s Pro Tips

  • Cooking Options: This recipe works great on the grill, skillet, or in the air fryer. Each method gives a slightly different texture and flavor.
  • Don’t Overcook: Pork is perfectly done at 145°F. Let it rest for 5 minutes before slicing so the juices can settle back into the meat.

Print

Pork Chop Marinade

#wprm-recipe-user-rating-0 .wprm-rating-star.wprm-rating-star-full svg * { fill: #343434; }#wprm-recipe-user-rating-0 .wprm-rating-star.wprm-rating-star-33 svg * { fill: url(#wprm-recipe-user-rating-0-33); }#wprm-recipe-user-rating-0 .wprm-rating-star.wprm-rating-star-50 svg * { fill: url(#wprm-recipe-user-rating-0-50); }#wprm-recipe-user-rating-0 .wprm-rating-star.wprm-rating-star-66 svg * { fill: url(#wprm-recipe-user-rating-0-66); }linearGradient#wprm-recipe-user-rating-0-33 stop { stop-color: #343434; }linearGradient#wprm-recipe-user-rating-0-50 stop { stop-color: #343434; }linearGradient#wprm-recipe-user-rating-0-66 stop { stop-color: #343434; }

Bright, zesty, and full of flavor, this Pork Chop Marinade transforms pork chops into tender, juicy perfection, with a secret citrus twist!
Course pantry staple
Cuisine American
Keyword easy pork chop marinade, pork chop marinade, pork chop marinade recipe, pork marinade
Prep Time 5 minutes
Total Time 5 minutes
Servings 4 pork chops
Calories 252kcal

Ingredients

  • ¼ cup soy sauce
  • ¼ cup orange juice
  • 2 tablespoons brown sugar
  • 3 cloves minced garlic
  • 1 tablespoon Dijon mustard
  • ½ teaspoon black pepper
  • 4 pork chops

Instructions

  • In a medium bowl, whisk together ¼ cup soy sauce, ¼ cup orange juice, 2 tablespoons brown sugar, 3 cloves minced garlic, 1 tablespoon Dijon mustard, and ½ teaspoon black pepper.
  • Pour your marinade into a sealable plastic bag and place 4 pork chops into the bag with the marinade and allow them to marinate for at least an hour.
  • Cook your pork chops with your preferred method, you can grill, bake or cook them on the stovetop.
  • Discard any used marinade.

Video

Notes

Storing Unused Marinade

Unused pork chop marinade can be stored in an airtight bag or container in the refrigerator for up to 1 week. If the marinade has already been used on raw meat, discard it; don’t reuse it.

Nutrition

Calories: 252kcal | Carbohydrates: 9g | Protein: 31g | Fat: 9g | Saturated Fat: 3g | Polyunsaturated Fat: 1g | Monounsaturated Fat: 4g | Trans Fat: 0.1g | Cholesterol: 90mg | Sodium: 918mg | Potassium: 588mg | Fiber: 0.4g | Sugar: 7g | Vitamin A: 41IU | Vitamin C: 8mg | Calcium: 27mg | Iron: 1mg
Closeup of grilled pork chops.

Jalapeño Ranch Dressing

Spice meets creamy! This Jalapeño Ranch Dressing is cool, tangy, and just the right amount of zesty heat. Perfect for drizzling, dipping, or smothering on everything from salads to tacos.

Someone getting a spoon of jalapeño ranch dressing from a small jar.

Your Ranch Glow-Up

  • Cool with a Kick: Creamy ranch gets a bold upgrade with fresh jalapeños for just the right balance of heat and tang.
  • Versatile: Use it as a salad dressing, dip for veggies, drizzled over tacos and chimichangas, or even a sauce for burgers and wraps.
  • Fresh & Flavorful: Made with real herbs, lime, and jalapeños, this dressing tastes way brighter than anything store-bought.
  • Quick to Whip Up: Toss everything in a blender and you’ve got a delicious dressing in minutes!

Jalapeño Ranch Dressing Ingredients

Overhead shot of labeled ingredients.
  • Swap the Base: For a lighter, tangy twist, you can replace some or all of the mayo and sour cream with plain Greek yogurt instead.
  • Turn Up the Heat: Want an extra kick? Then stir in a pinch of red pepper flakes or chili powder to spice things up.
  • Get Creative: This jalapeño dressing isn’t just for salads! Use it as a dip for avocado egg rolls, a spread on sandwiches, or a drizzle over tacos.

How to Make Jalapeño Ranch Dressing

This easy recipe comes together in just minutes. It’s so simple and has fresh ingredients and the best flavor, you’ll never go back to store-bought!

  1. Combine: Add all of the ingredients into a blender or food processor.
  2. Blend Ingredients: Blend the ingredients until smooth and creamy. Enjoy this dressing on salads, use it as a dip for vegetables, or a sauce for anything you desire!

Alyssa’s Pro Tip

Jalapeño: If you LOVE the spicy jalapeño flavor, then add 2 jalapeños to the blender! You can also throw in a few seeds because that’s where the heat is.

Print

Jalapeño Ranch Dressing

#wprm-recipe-user-rating-1 .wprm-rating-star.wprm-rating-star-full svg * { fill: #343434; }#wprm-recipe-user-rating-1 .wprm-rating-star.wprm-rating-star-33 svg * { fill: url(#wprm-recipe-user-rating-1-33); }#wprm-recipe-user-rating-1 .wprm-rating-star.wprm-rating-star-50 svg * { fill: url(#wprm-recipe-user-rating-1-50); }#wprm-recipe-user-rating-1 .wprm-rating-star.wprm-rating-star-66 svg * { fill: url(#wprm-recipe-user-rating-1-66); }linearGradient#wprm-recipe-user-rating-1-33 stop { stop-color: #343434; }linearGradient#wprm-recipe-user-rating-1-50 stop { stop-color: #343434; }linearGradient#wprm-recipe-user-rating-1-66 stop { stop-color: #343434; }

Creamy, zesty, and packed with a kick of fresh jalapeño, this homemade ranch dressing is perfect for salads, tacos, or dipping everything in.
Course Dressing
Cuisine American
Keyword easy, jalapeno cilantro dressing, jalapeno ranch dressing recipe
Prep Time 5 minutes
Total Time 5 minutes
Servings 12 Servings
Calories 150kcal

Ingredients

  • 1 cup mayonnaise or Greek yogurt
  • ½ cup sour cream
  • ¼ cup buttermilk
  • 1 (1-ounce) packet ranch seasoning powder
  • 1 whole jalapeño stem removed and seeded
  • 2 teaspoons lime juice
  • ½ cup chopped fresh cilantro
  • ¼ teaspoon salt more if needed

Instructions

  • In a blender, add 1 cup mayonnaise, ½ cup sour cream, ¼ cup buttermilk, 1 (1-ounce) packet ranch seasoning powder, 1 whole jalapeño, 2 teaspoons lime juice, ½ cup chopped fresh cilantro, and ¼ teaspoon salt
  • Blend until smooth and combined. Store in an airtight container in the refrigerator for up to 1 week.

Notes

Storage: Keep jalapeño ranch in an airtight jar or container in the fridge for up to 1 week. Stir or shake before using if ingredients settle.

Nutrition

Calories: 150kcal | Carbohydrates: 1g | Protein: 1g | Fat: 16g | Saturated Fat: 3g | Polyunsaturated Fat: 8g | Monounsaturated Fat: 4g | Trans Fat: 0.03g | Cholesterol: 14mg | Sodium: 133mg | Potassium: 30mg | Fiber: 0.1g | Sugar: 1g | Vitamin A: 138IU | Vitamin C: 2mg | Calcium: 18mg | Iron: 0.1mg
Small jar of Jalapeño ranch dressing.

More Tasty Dressing Recipes

If you loved this, you’ll be a fan of all my homemade dressings! Keep it fresh and mix up one of these dressing recipes next!

Fried Pickle Dip

Meet my Fried Pickle Dip…a viral take on my popular pickle dip! The toasted bread crumbs elevate the flavors with the crunchy “fried” texture.

Someone taking a scoop of fried pickle dip with a ruffle chip.

The Insider Scoop on This Fried Pickle Dip

  • Crunch in Every Bite: My secret is to layer the toasted bread crumbs inside so every scoop has that fried pickle crunch.
  • All the Pickle Love: I tested this until the creaminess and tang hit just right. It’s packed with dill pickle flavor (because you know I’m obsessed)!
  • Make-Ahead Friendly: This dip never lasts long at my house. You can prep it ahead, and it still tastes like heaven when served.

Fried Pickle Dip Ingredients

Overhead shot of labeled fried pickle dip ingredients.
  • Dill Pickles: Use your favorite brand of dill pickle! Dab the chopped pickles with a paper towel to absorb any extra moisture. This prevents your dip from being runny.
  • Cream Cheese: Be sure to use softened cream cheese so your dip mixes well.
  • Panko Bread Crumbs: No substitutions here…Panko is a must! It’s the key to getting that perfect crunchy “fried” texture.

How to Make Fried Pickle Dip

You already know how obsessed I am with pickles. So when I heard about fried pickle dip, I had to try it. And let me tell you, it’s everything I hoped for and more! Creamy, crunchy, tangy, and downright addictive. It’s the perfect snack!

  1. Toast the Panko BreadCrumbs: In a medium-sized skillet over medium heat, add the butter and Panko bread crumbs. Once the butter melts, stir frequently to toast the bread crumbs for 2-3 minutes, until golden brown.
  2. Combine: In a medium-sized bowl, combine the sour cream, softened cream cheese, ranch seasoning, chopped dill pickles, pickle juice, garlic powder, and fresh dill.
  3. Mix: Using an electric hand mixer, mix until well-combined.
  4. Garnish and Serve: Serve immediately or chill for 1 hour to let the flavors blend and to thicken the dip. Before serving, top the dip with the toasted Panko bread crumbs and garnish with more fresh dill, if desired. Serve fried pickle dip with pretzels or potato chips!

Alyssa’s Pro Tip

Want the “fried” crunch in EVERY bite? Layer toasted bread crumbs inside the pickle dip. Add half the dip, sprinkle crumbs, then repeat with the rest.

Print

Fried Pickle Dip

#wprm-recipe-user-rating-2 .wprm-rating-star.wprm-rating-star-full svg * { fill: #343434; }#wprm-recipe-user-rating-2 .wprm-rating-star.wprm-rating-star-33 svg * { fill: url(#wprm-recipe-user-rating-2-33); }#wprm-recipe-user-rating-2 .wprm-rating-star.wprm-rating-star-50 svg * { fill: url(#wprm-recipe-user-rating-2-50); }#wprm-recipe-user-rating-2 .wprm-rating-star.wprm-rating-star-66 svg * { fill: url(#wprm-recipe-user-rating-2-66); }linearGradient#wprm-recipe-user-rating-2-33 stop { stop-color: #343434; }linearGradient#wprm-recipe-user-rating-2-50 stop { stop-color: #343434; }linearGradient#wprm-recipe-user-rating-2-66 stop { stop-color: #343434; }

Creamy, tangy dip packed with pickles and topped with crunchy bread crumbs for that irresistible “fried” flavor in every bite.
Course Appetizer
Cuisine American
Keyword fried pickle dip recipe, pickle dip
Prep Time 15 minutes
Total Time 15 minutes
Servings 4 Servings
Calories 336kcal

Ingredients

  • ½ cup Panko bread crumbs
  • 1 tablespoon unsalted butter
  • 1 ½ cups sour cream
  • 4 ounces softened cream cheese
  • 1 (1-ounce) packet Ranch seasoning
  • 1 ½ cups chopped dill pickles
  • 2 tablespoons dill pickle juice
  • 1 teaspoon garlic powder
  • 1 tablespoon minced fresh dill

Instructions

  • In a medium-sized skillet over medium heat, add 1 tablespoon unsalted butter and ½ cup Panko bread crumbs. Once the butter melts, stir frequently to toast the bread crumbs for 2-3 minutes, until golden brown.
  • In a medium-sized bowl, combine 1 ½ cups sour cream, 4 ounces softened cream cheese, 1 (1-ounce) packet Ranch seasoning, 1 ½ cups chopped dill pickles, 2 tablespoons dill pickle juice, 1 teaspoon garlic powder, and 1 tablespoon minced fresh dill.
  • Using an electric hand mixer, mix until well-combined.
  • Serve immediately or chill for 1 hour to let the flavors blend and to thicken the dip. Before serving, top the dip with the toasted Panko bread crumbs and garnish with more fresh dill, if desired. Serve with potato chips!

Notes

Storing Leftovers
  • Refrigerator: Store dill pickle dip in an airtight container for 3–4 days. Add bread crumbs to portions only, since they soften in the fridge.
  • Freezer: Not recommended. The cream cheese changes texture once thawed.

Nutrition

Calories: 336kcal | Carbohydrates: 13g | Protein: 5g | Fat: 30g | Saturated Fat: 16g | Polyunsaturated Fat: 1g | Monounsaturated Fat: 7g | Trans Fat: 0.1g | Cholesterol: 87mg | Sodium: 757mg | Potassium: 231mg | Fiber: 1g | Sugar: 5g | Vitamin A: 1111IU | Vitamin C: 2mg | Calcium: 159mg | Iron: 1mg
Overhead shot of a bowl of fried pickle dip.

More Pickle-Inspired Recipes

If you guys liked this fried pickle dip, you need to check out my other pickle recipes!

Fried Pickle Dip

Meet my Fried Pickle Dip…a viral take on my popular pickle dip! The toasted bread crumbs elevate the flavors with the crunchy “fried” texture.

Someone taking a scoop of fried pickle dip with a ruffle chip.

The Insider Scoop on This Fried Pickle Dip

  • Crunch in Every Bite: My secret is to layer the toasted bread crumbs inside so every scoop has that fried pickle crunch.
  • All the Pickle Love: I tested this until the creaminess and tang hit just right. It’s packed with dill pickle flavor (because you know I’m obsessed)!
  • Make-Ahead Friendly: This dip never lasts long at my house. You can prep it ahead, and it still tastes like heaven when served.

Fried Pickle Dip Ingredients

Overhead shot of labeled fried pickle dip ingredients.
  • Dill Pickles: Use your favorite brand of dill pickle! Dab the chopped pickles with a paper towel to absorb any extra moisture. This prevents your dip from being runny.
  • Cream Cheese: Be sure to use softened cream cheese so your dip mixes well.
  • Panko Bread Crumbs: No substitutions here…Panko is a must! It’s the key to getting that perfect crunchy “fried” texture.

How to Make Fried Pickle Dip

You already know how obsessed I am with pickles. So when I heard about fried pickle dip, I had to try it. And let me tell you, it’s everything I hoped for and more! Creamy, crunchy, tangy, and downright addictive. It’s the perfect snack!

  1. Toast the Panko BreadCrumbs: In a medium-sized skillet over medium heat, add the butter and Panko bread crumbs. Once the butter melts, stir frequently to toast the bread crumbs for 2-3 minutes, until golden brown.
  2. Combine: In a medium-sized bowl, combine the sour cream, softened cream cheese, ranch seasoning, chopped dill pickles, pickle juice, garlic powder, and fresh dill.
  3. Mix: Using an electric hand mixer, mix until well-combined.
  4. Garnish and Serve: Serve immediately or chill for 1 hour to let the flavors blend and to thicken the dip. Before serving, top the dip with the toasted Panko bread crumbs and garnish with more fresh dill, if desired. Serve fried pickle dip with pretzels or potato chips!

Alyssa’s Pro Tip

Want the “fried” crunch in EVERY bite? Layer toasted bread crumbs inside the pickle dip. Add half the dip, sprinkle crumbs, then repeat with the rest.

Print

Fried Pickle Dip

#wprm-recipe-user-rating-2 .wprm-rating-star.wprm-rating-star-full svg * { fill: #343434; }#wprm-recipe-user-rating-2 .wprm-rating-star.wprm-rating-star-33 svg * { fill: url(#wprm-recipe-user-rating-2-33); }#wprm-recipe-user-rating-2 .wprm-rating-star.wprm-rating-star-50 svg * { fill: url(#wprm-recipe-user-rating-2-50); }#wprm-recipe-user-rating-2 .wprm-rating-star.wprm-rating-star-66 svg * { fill: url(#wprm-recipe-user-rating-2-66); }linearGradient#wprm-recipe-user-rating-2-33 stop { stop-color: #343434; }linearGradient#wprm-recipe-user-rating-2-50 stop { stop-color: #343434; }linearGradient#wprm-recipe-user-rating-2-66 stop { stop-color: #343434; }

Creamy, tangy dip packed with pickles and topped with crunchy bread crumbs for that irresistible “fried” flavor in every bite.
Course Appetizer
Cuisine American
Keyword fried pickle dip recipe, pickle dip
Prep Time 15 minutes
Total Time 15 minutes
Servings 4 Servings
Calories 336kcal

Ingredients

  • ½ cup Panko bread crumbs
  • 1 tablespoon unsalted butter
  • 1 ½ cups sour cream
  • 4 ounces softened cream cheese
  • 1 (1-ounce) packet Ranch seasoning
  • 1 ½ cups chopped dill pickles
  • 2 tablespoons dill pickle juice
  • 1 teaspoon garlic powder
  • 1 tablespoon minced fresh dill

Instructions

  • In a medium-sized skillet over medium heat, add 1 tablespoon unsalted butter and ½ cup Panko bread crumbs. Once the butter melts, stir frequently to toast the bread crumbs for 2-3 minutes, until golden brown.
  • In a medium-sized bowl, combine 1 ½ cups sour cream, 4 ounces softened cream cheese, 1 (1-ounce) packet Ranch seasoning, 1 ½ cups chopped dill pickles, 2 tablespoons dill pickle juice, 1 teaspoon garlic powder, and 1 tablespoon minced fresh dill.
  • Using an electric hand mixer, mix until well-combined.
  • Serve immediately or chill for 1 hour to let the flavors blend and to thicken the dip. Before serving, top the dip with the toasted Panko bread crumbs and garnish with more fresh dill, if desired. Serve with potato chips!

Notes

Storing Leftovers
  • Refrigerator: Store dill pickle dip in an airtight container for 3–4 days. Add bread crumbs to portions only, since they soften in the fridge.
  • Freezer: Not recommended. The cream cheese changes texture once thawed.

Nutrition

Calories: 336kcal | Carbohydrates: 13g | Protein: 5g | Fat: 30g | Saturated Fat: 16g | Polyunsaturated Fat: 1g | Monounsaturated Fat: 7g | Trans Fat: 0.1g | Cholesterol: 87mg | Sodium: 757mg | Potassium: 231mg | Fiber: 1g | Sugar: 5g | Vitamin A: 1111IU | Vitamin C: 2mg | Calcium: 159mg | Iron: 1mg
Overhead shot of a bowl of fried pickle dip.

More Pickle-Inspired Recipes

If you guys liked this fried pickle dip, you need to check out my other pickle recipes!

J Dawgs Sauce (Copycat)

Here in Utah, J. Dawgs is basically a religion! Their hot dogs are THAT good. The sweet, tangy, smoky sauce? Life-changing! Make this copycat J Dawgs sauce at home and you’ll never look at ketchup the same way again.

Someone squeezing J Dawgs sauce on a hot dog.

Reasons You’ll Lick the Spoon

  • Sweet & Smoky Magic: The perfect balance of sweet and smoky flavor goes so well with salty, savory hot dogs!
  • Versatile Drizzle: This sauce is not just for hot dogs. You can slather it on burgers, sandwiches, or even grilled veggies.
  • Game Day Glory: Be the master tailgater or game day party host with the BEST hot dogs (jdawgs) on the block.

J Dawgs Special Sauce Ingredients

Overhead shot of labeled ingredients.
  • Switch Up the BBQ Sauce: We used Sweet Baby Ray’s, but feel free to use your favorite (just steer clear of mustard-based sauces).
  • Paprika Pick: Smoked paprika will give a deeper, smoky flavor, while regular paprika keeps it mild and sweet.
  • Turn Up the Heat: Add a pinch or two of cayenne pepper if you like a little kick!

How to Make Copycat J Dawgs Sauce

J Dawgs started out as a tiny little shaw right outside BYU’s campus. The lines got longer and longer, and now the obsession has blown up across Utah. With just a few pantry staples, you can make their famous jdawg sauce at home!

  1. Combine Ingredients and Heat: Combine ketchup, brown sugar, barbecue sauce, honey, apple cider vinegar, onion powder, garlic powder, and smoked paprika in a small saucepan and cook over medium heat for 2-3 minutes, until boiling.
  2. Simmer, Cool, and Enjoy: Reduce the heat to medium-low and let the sauce simmer for 3-4 minutes, until all the sugar has dissolved. Remove from the heat and cool completely before storing in an airtight container in the refrigerator for up to 2 weeks.
All of the sauce ingredients combined into a pot and simmering on the stove.

The Complete J Dawgs Experience

Making J Dawgs hot dogs at home comes down to the little extras, like perfectly toasted buns, signature grill marks, and must-have toppings. Here’s how to nail it:

  • Type of Dog: For the full J. Dawgs experience, use all-beef hot dogs (I love the jumbo Costco ones). Or try a Polish dog for a spicier kick!
  • Toast the Hot Dog Buns: Melt a little butter in a skillet over medium heat, place your buns facedown, and cook until golden and crisp to your liking.
  • Score for Style: Add criss-cross cuts to your hot dogs before grilling for that classic J. Dawgs signature look (a hot dog hack I swear by!). I love using this handy tool.
  • Topping Ideas: The traditional lineup is chopped onions, sauerkraut, banana peppers, jalapeños, and pickles, but honestly, anything goes. Or keep it simple and let the J Dawgs sauce shine all on its own.

Print

J. Dawgs Special Sauce

#wprm-recipe-user-rating-3 .wprm-rating-star.wprm-rating-star-full svg * { fill: #343434; }#wprm-recipe-user-rating-3 .wprm-rating-star.wprm-rating-star-33 svg * { fill: url(#wprm-recipe-user-rating-3-33); }#wprm-recipe-user-rating-3 .wprm-rating-star.wprm-rating-star-50 svg * { fill: url(#wprm-recipe-user-rating-3-50); }#wprm-recipe-user-rating-3 .wprm-rating-star.wprm-rating-star-66 svg * { fill: url(#wprm-recipe-user-rating-3-66); }linearGradient#wprm-recipe-user-rating-3-33 stop { stop-color: #343434; }linearGradient#wprm-recipe-user-rating-3-50 stop { stop-color: #343434; }linearGradient#wprm-recipe-user-rating-3-66 stop { stop-color: #343434; }

Sweet, tangy, and smoky, this copycat J. Dawgs Sauce is perfect on hot dogs, burgers, or grilled chicken. Made with simple pantry ingredients in minutes.
Course condiment, pantry staple, Sauce
Cuisine American, Utah
Keyword j.dawg’s sauce copycat, j.dawg’s sauce recipe, j.dawg’s special sauce, j.dawg’s special sauce copycat, j.dawg’s special sauce copycat recipe, j.dawg’s special sauce recipe, jdawgs sauce, jdawgs special sauce
Prep Time 8 minutes
Total Time 8 minutes
Servings 24 servings
Calories 34kcal

Equipment

  • 1 small saucepan

Ingredients

  • ½ cup ketchup
  • ½ cup packed brown sugar
  • ¼ cup barbecue sauce
  • 2 tablespoons honey
  • 2 teaspoons apple cider vinegar
  • 1 teaspoon onion powder
  • ¼ teaspoon garlic powder
  • ¼ teaspoon smoked paprika
  • salt to taste
  • ground black pepper to taste

Instructions

  • Combine ½ cup ketchup, ½ cup packed brown sugar, ¼ cup barbecue sauce, 2 tablespoons honey, 2 teaspoons apple cider vinegar, 1 teaspoon onion powder, ¼ teaspoon garlic powder, and ¼ teaspoon smoked paprika in a small saucepan and cook over medium heat for 2-3 minutes, until boiling.
  • Reduce the heat to medium-low and let the sauce simmer for 3-4 minutes, until all the sugar has dissolved. Remove from the heat and cool completely before storing in the refrigerator for up to 2 weeks.

Notes

Each serving is 1 tablespoon of sauce. 

Store leftover J.Dawg’s sauce in an airtight container or bottle in the refrigerator for up to 2 weeks. 

Nutrition

Calories: 34kcal | Carbohydrates: 9g | Protein: 0.1g | Fat: 0.03g | Saturated Fat: 0.003g | Polyunsaturated Fat: 0.01g | Monounsaturated Fat: 0.004g | Sodium: 84mg | Potassium: 34mg | Fiber: 0.1g | Sugar: 8g | Vitamin A: 43IU | Vitamin C: 0.3mg | Calcium: 7mg | Iron: 0.1mg
Small bowl of J Dawgs sauce with a spoon.

More Easy Sauce Recipes

Fresh Fruit Salsa

I can’t stop eating this fresh fruit salsa! Sweet berries, tropical mango, and a splash of lime, get outta here! It’s so good, especially with my crispy cinnamon sugar chips!

Close up shot of a bowl of fresh fruit salsa.

Reasons You’ll Be Obsessed!

  • Flavor Explosion: A juicy mix of sweet, tangy, and tropical in every bite.
  • Versatile: Our favorite way to enjoy fruit salsa is with my cinnamon chips, but tortilla chips also work! You can also serve it over vanilla ice cream, pancakes, crepes, or topped with fresh whipped cream.
  • Crowd Charmer: Bright colors + bold flavors = guaranteed compliments.

Fruit Salsa Ingredients

Overhead shot of labeled ingredients.
  • Apple: The apple adds a crispy texture in every bite! Use your favorite kind of apple.
  • Lime: The squeeze of lime helps keep the apple from browning. Substitute with lemon juice if you prefer.
  • Fruit Preserves: I LOVE the addition of the raspberry flavor in this salsa, but you can use any flavor preserves you like! Try strawberry, apricot, or orange marmalade.
  • Fruit: If you want, you can try switching up the fruit by using pears, peaches, or blueberries. But, avoid using fruit that gets mushy, like bananas and fresh raspberries.
  • Add Herbs: You can add fresh herbs like mint and basil to give the salsa depth in flavor. It’s also pretty for garnish!

How to Make Fruit Salsa

This fruit salsa recipe comes together in just minutes. Once you’ve got your fruit prepped, it’s as easy as toss, chill, and serve. Trust me, the hardest part is not eating it all straight from the bowl!

  1. Add Lime Juice: Squeeze the juice of a lime over the diced apple, then stir to coat.
  2. Combine Fruit: In a large bowl, combine the strawberries, kiwis, apples, and mangoes.
  3. Raspberry Jam: Add raspberry jam to the fruit.
  4. Stir and Serve: Gently stir to combine and serve with cinnamon chips and enjoy!

Alyssa’s Pro Tip

Cutting the Fruit: The trick to perfect fruit salsa is to dice the fruit! You want small and uniform bite-size pieces.

Someone taking a scoop of fruit salsa with a cinnamon sugar chip.

How to Store Fruit Salsa

  • In the Refrigerator: Store fruit salsa in an airtight container in the fridge for 2 days. Give it a stir before you serve it again.
  • Make in Advance: Fruit salsa is great to make ahead for your guests. I think it’s even better the next day because the juices from the fruit get sweeter as it sits!
  • In the Freezer: Do not freeze fresh fruit salsa! If you do, the fruit will thaw into a watery, mushy texture.

Print

Fruit Salsa

#wprm-recipe-user-rating-4 .wprm-rating-star.wprm-rating-star-full svg * { fill: #343434; }#wprm-recipe-user-rating-4 .wprm-rating-star.wprm-rating-star-33 svg * { fill: url(#wprm-recipe-user-rating-4-33); }#wprm-recipe-user-rating-4 .wprm-rating-star.wprm-rating-star-50 svg * { fill: url(#wprm-recipe-user-rating-4-50); }#wprm-recipe-user-rating-4 .wprm-rating-star.wprm-rating-star-66 svg * { fill: url(#wprm-recipe-user-rating-4-66); }linearGradient#wprm-recipe-user-rating-4-33 stop { stop-color: #343434; }linearGradient#wprm-recipe-user-rating-4-50 stop { stop-color: #343434; }linearGradient#wprm-recipe-user-rating-4-66 stop { stop-color: #343434; }

A sweet and refreshing mix of chopped fruit tossed with citrus and a touch of jam. Perfect for parties, snacking, or summer desserts!
Course Appetizer, Snack
Cuisine American
Keyword fresh fruit salsa, fresh fruit salsa recipe, fruit salsa, fruit salsa recipe
Prep Time 15 minutes
Total Time 15 minutes
Servings 6 Servings
Calories 107kcal

Ingredients

  • 1 (16-ounce) container diced strawberries
  • 3 medium diced kiwis peeled
  • 1 large diced honey crisp apple peeled and cored
  • 2 large diced mangoes peeled
  • ½ lime juiced
  • 2 tablespoons raspberry jam or any flavor

Instructions

  • Squeeze the juice of ½ lime over the diced apple and stir to coat.
  • To a large bowl, combine 1 (16-ounce) container diced strawberries, 3 medium diced kiwis, 1 large diced honey crisp apple, and 2 large diced mangoes.
  • Add 2 tablespoons raspberry jam to the fruit then gently stir to combine.
  • Serve with cinnamon chips and enjoy!

Notes

Storage: Store fruit salsa in an airtight container in the fridge for up to 2 days, and give it a quick stir before serving. It’s even better the next day! But don’t freeze it, or you’ll end up with a watery mess.

Nutrition

Calories: 107kcal | Carbohydrates: 27g | Protein: 1g | Fat: 1g | Saturated Fat: 0.1g | Polyunsaturated Fat: 0.2g | Monounsaturated Fat: 0.1g | Sodium: 6mg | Potassium: 257mg | Fiber: 4g | Sugar: 21g | Vitamin A: 809IU | Vitamin C: 63mg | Calcium: 29mg | Iron: 0.3mg

More Dip Recipes to Try!

Dips are always a hit and perfect for just about any get-together! Here are some of my all-time favorites to make for game days, holidays, or casual family hangouts—you’ve got to give them a try!

Balsamic Chicken Marinade

I’ve been on a balsamic kick lately. Drizzling it on salads, veggies, and even watermelon! But this Balsamic Chicken marinade is pure magic. It’s tangy, a little sweet, and makes everyday chicken taste incredible!

Overhead shot of grilled chicken that was cooked in balsamic chicken marinade.

Marinade Magic

  • Big Taste, Easy Prep: Balsamic chicken marinade packs bold, tangy flavor using just a few pantry staples.
  • Great for Meal Prep: Marinate ahead of time and then cook when you want. Perfect for quick weeknight meals or weekend grilling.
  • Cook Your Way: Grill it, pan-sear it, or roast it, this marinade performs like a champ no matter how you cook it up.
  • Pairs with Everything: Serve your balsamic chicken on salads, with veggies, rice, or pasta. It’s a tasty go-to for any meal!

Balsamic Chicken Marinade Ingredients

Overhead shot of labeled ingredients.
  • For sweetness: If you prefer brown sugar, it swaps in easily for the honey. Want it sweeter? Then add a tablespoon or two more of honey.
  • Add fresh herbs: Not into Italian seasoning? Skip it and toss in some chopped fresh herbs instead, about a teaspoon each. Rosemary, thyme, and oregano all play really well with balsamic.
  • Balsamic vinegar: No need to splurge here, affordable balsamic works perfectly since it gets mixed in. Save the fancy stuff for a drizzle on top when serving.

How to Make Balsamic Chicken Marinade

This easy balsamic chicken marinade takes 5 minutes to prepare! Just whisk the ingredients together and pour them into a large zip-top bag with your chicken!

  1. Combine: Add the chicken breasts to a gallon ziplock bag, then set aside. Add the balsamic vinegar, olive oil, honey, garlic, mustard, Italian seasoning, salt, and pepper to a medium bowl, mix until fully combined.
  2. Marinate: Pour the marinade over the chicken in the bag and close it. Be sure to press out all the air from the bag. Squish the chicken around to ensure all of it is covered with the marinade. Set it aside to marinate at room temperature for 1-1 ½ hours, or in the fridge for up to 8 hours. *Tip: Don’t marinate too long. If you do it over 8 hours (or 2 at room temp), the vinegar can make it mushy.
  3. Cook: Once finished marinating, discard the sauce and cook the chicken using your preferred cooking method. *Cooking instructions in recipe card below.

Alyssa’s Pro Tip

Doubling Up? If you’re marinating more than 2 pounds of chicken, go ahead and double the recipe. Every piece of chicken deserves its fair share of balsamic chicken marinade flavor.

Freezing and Storing Cooked Chicken

  • Freezing: If you’re freezing the chicken in the balsamic chicken marinade, it’ll keep for up to 3 months. Just thaw it overnight in the fridge before cooking.
  • Storing Cooked Chicken: Once cooked, you can then store the chicken in the fridge for up to 7 days, or freeze it in an airtight container for up to 3 months.

Print

Balsamic Chicken Marinade

#wprm-recipe-user-rating-5 .wprm-rating-star.wprm-rating-star-full svg * { fill: #343434; }#wprm-recipe-user-rating-5 .wprm-rating-star.wprm-rating-star-33 svg * { fill: url(#wprm-recipe-user-rating-5-33); }#wprm-recipe-user-rating-5 .wprm-rating-star.wprm-rating-star-50 svg * { fill: url(#wprm-recipe-user-rating-5-50); }#wprm-recipe-user-rating-5 .wprm-rating-star.wprm-rating-star-66 svg * { fill: url(#wprm-recipe-user-rating-5-66); }linearGradient#wprm-recipe-user-rating-5-33 stop { stop-color: #343434; }linearGradient#wprm-recipe-user-rating-5-50 stop { stop-color: #343434; }linearGradient#wprm-recipe-user-rating-5-66 stop { stop-color: #343434; }

This tangy-sweet balsamic chicken marinade comes together in minutes and works like magic whether you’re grilling, baking, or pan-searing.
Course Dinner, entree, Main Course, main dish, marinade, pantry staple
Cuisine American, Italian, Italian American, Mediterranean
Keyword balsamic chicken cobb salad with pasta recipe, balsamic chicken marinade, balsamic chicken marinade recipe, balsamic chicken recipe, balsamic grilled chicken, balsamic marinade, balsamic marinade recipe, easy balsamic chicken marinade, easy balsamic marinade, Glazed Honey Balsamic Chicken with Potatoes, quick balsamic marinade
Prep Time 5 minutes
Marinating Time 1 hour
Servings 6 servings
Calories 267kcal

Equipment

  • large ziplock bag

Ingredients

  • 2 pounds boneless, skinless chicken breasts or thighs
  • ½ cup balsamic vinegar
  • 3 tablespoons olive oil
  • 1 tablespoon honey optional
  • 2 teaspoons minced garlic about 2 cloves
  • 1 teaspoon Dijon mustard
  • 1 teaspoon Italian seasoning
  • 1 ½ teaspoons salt
  • ½ teaspoon ground black pepper

Instructions

  • Add 2 pounds boneless, skinless chicken breasts to a gallon ziplock bag and set aside.
  • Add ½ cup balsamic vinegar, 3 tablespoons olive oil, 1 tablespoon honey, 2 teaspoons minced garlic, 1 teaspoon Dijon mustard, 1 teaspoon Italian seasoning, 1 ½ teaspoons salt, and ½ teaspoon ground black pepper to a medium bowl and mix until fully combined.
  • Pour the marinade over the chicken in the bag and close it carefully, pressing out all the air from the bag so the chicken is fully covered in the marinade.
  • Squish the chicken around to ensure all of it is covered with the marinade before setting it aside to marinate at room temperature for 1-1 ½ hours, or in the refrigerator for up to 8 hours.
  • Once finished marinating, discard the marinade and cook the chicken using your preferred cooking method.

Notes

Storage: Marinate the chicken for up to 8 hours; any longer and the vinegar can make it mushy. You can freeze the raw chicken in the marinade for up to 3 months, or store cooked chicken in the fridge for 7 days or in the freezer for 3 months.

Grill: Preheat the grill to medium heat, then grill the marinated chicken on both sides for 6-8 minutes, or until it reaches an internal temperature of 165°F. 

Oven: Preheat the oven to 400°F and bake the chicken for 20-25 minutes, or until it reaches an internal temperature of 165°F. 

Skillet: Cook the chicken in a large skillet over medium heat for 5-7 minutes on each side, until it reaches an internal temperature of 165°F. 

Nutrition

Calories: 267kcal | Carbohydrates: 7g | Protein: 32g | Fat: 11g | Saturated Fat: 2g | Polyunsaturated Fat: 1g | Monounsaturated Fat: 6g | Trans Fat: 0.02g | Cholesterol: 97mg | Sodium: 771mg | Potassium: 597mg | Fiber: 0.2g | Sugar: 6g | Vitamin A: 53IU | Vitamin C: 2mg | Calcium: 22mg | Iron: 1mg
Bag of raw chicken in the balsamic chicken marinade.

More Marinade Recipes

A good marinade can turn a simple meal into something amazing! It adds flavor, softens the meat, and makes it juicy and delicious. Here are some other tried and true favorites!

Balsamic Chicken Marinade

I’ve been on a balsamic kick lately. Drizzling it on salads, veggies, and even watermelon! But this Balsamic Chicken marinade is pure magic. It’s tangy, a little sweet, and makes everyday chicken taste incredible!

Overhead shot of grilled chicken that was cooked in balsamic chicken marinade.

Marinade Magic

  • Big Taste, Easy Prep: Balsamic chicken marinade packs bold, tangy flavor using just a few pantry staples.
  • Great for Meal Prep: Marinate ahead of time and then cook when you want. Perfect for quick weeknight meals or weekend grilling.
  • Cook Your Way: Grill it, pan-sear it, or roast it, this marinade performs like a champ no matter how you cook it up.
  • Pairs with Everything: Serve your balsamic chicken on salads, with veggies, rice, or pasta. It’s a tasty go-to for any meal!

Balsamic Chicken Marinade Ingredients

Overhead shot of labeled ingredients.
  • For sweetness: If you prefer brown sugar, it swaps in easily for the honey. Want it sweeter? Then add a tablespoon or two more of honey.
  • Add fresh herbs: Not into Italian seasoning? Skip it and toss in some chopped fresh herbs instead, about a teaspoon each. Rosemary, thyme, and oregano all play really well with balsamic.
  • Balsamic vinegar: No need to splurge here, affordable balsamic works perfectly since it gets mixed in. Save the fancy stuff for a drizzle on top when serving.

How to Make Balsamic Chicken Marinade

This easy balsamic chicken marinade takes 5 minutes to prepare! Just whisk the ingredients together and pour them into a large zip-top bag with your chicken!

  1. Combine: Add the chicken breasts to a gallon ziplock bag, then set aside. Add the balsamic vinegar, olive oil, honey, garlic, mustard, Italian seasoning, salt, and pepper to a medium bowl, mix until fully combined.
  2. Marinate: Pour the marinade over the chicken in the bag and close it. Be sure to press out all the air from the bag. Squish the chicken around to ensure all of it is covered with the marinade. Set it aside to marinate at room temperature for 1-1 ½ hours, or in the fridge for up to 8 hours. *Tip: Don’t marinate too long. If you do it over 8 hours (or 2 at room temp), the vinegar can make it mushy.
  3. Cook: Once finished marinating, discard the sauce and cook the chicken using your preferred cooking method. *Cooking instructions in recipe card below.

Alyssa’s Pro Tip

Doubling Up? If you’re marinating more than 2 pounds of chicken, go ahead and double the recipe. Every piece of chicken deserves its fair share of balsamic chicken marinade flavor.

Freezing and Storing Cooked Chicken

  • Freezing: If you’re freezing the chicken in the balsamic chicken marinade, it’ll keep for up to 3 months. Just thaw it overnight in the fridge before cooking.
  • Storing Cooked Chicken: Once cooked, you can then store the chicken in the fridge for up to 7 days, or freeze it in an airtight container for up to 3 months.

Print

Balsamic Chicken Marinade

#wprm-recipe-user-rating-5 .wprm-rating-star.wprm-rating-star-full svg * { fill: #343434; }#wprm-recipe-user-rating-5 .wprm-rating-star.wprm-rating-star-33 svg * { fill: url(#wprm-recipe-user-rating-5-33); }#wprm-recipe-user-rating-5 .wprm-rating-star.wprm-rating-star-50 svg * { fill: url(#wprm-recipe-user-rating-5-50); }#wprm-recipe-user-rating-5 .wprm-rating-star.wprm-rating-star-66 svg * { fill: url(#wprm-recipe-user-rating-5-66); }linearGradient#wprm-recipe-user-rating-5-33 stop { stop-color: #343434; }linearGradient#wprm-recipe-user-rating-5-50 stop { stop-color: #343434; }linearGradient#wprm-recipe-user-rating-5-66 stop { stop-color: #343434; }

This tangy-sweet balsamic chicken marinade comes together in minutes and works like magic whether you’re grilling, baking, or pan-searing.
Course Dinner, entree, Main Course, main dish, marinade, pantry staple
Cuisine American, Italian, Italian American, Mediterranean
Keyword balsamic chicken cobb salad with pasta recipe, balsamic chicken marinade, balsamic chicken marinade recipe, balsamic chicken recipe, balsamic grilled chicken, balsamic marinade, balsamic marinade recipe, easy balsamic chicken marinade, easy balsamic marinade, Glazed Honey Balsamic Chicken with Potatoes, quick balsamic marinade
Prep Time 5 minutes
Marinating Time 1 hour
Servings 6 servings
Calories 267kcal

Equipment

  • large ziplock bag

Ingredients

  • 2 pounds boneless, skinless chicken breasts or thighs
  • ½ cup balsamic vinegar
  • 3 tablespoons olive oil
  • 1 tablespoon honey optional
  • 2 teaspoons minced garlic about 2 cloves
  • 1 teaspoon Dijon mustard
  • 1 teaspoon Italian seasoning
  • 1 ½ teaspoons salt
  • ½ teaspoon ground black pepper

Instructions

  • Add 2 pounds boneless, skinless chicken breasts to a gallon ziplock bag and set aside.
  • Add ½ cup balsamic vinegar, 3 tablespoons olive oil, 1 tablespoon honey, 2 teaspoons minced garlic, 1 teaspoon Dijon mustard, 1 teaspoon Italian seasoning, 1 ½ teaspoons salt, and ½ teaspoon ground black pepper to a medium bowl and mix until fully combined.
  • Pour the marinade over the chicken in the bag and close it carefully, pressing out all the air from the bag so the chicken is fully covered in the marinade.
  • Squish the chicken around to ensure all of it is covered with the marinade before setting it aside to marinate at room temperature for 1-1 ½ hours, or in the refrigerator for up to 8 hours.
  • Once finished marinating, discard the marinade and cook the chicken using your preferred cooking method.

Notes

Storage: Marinate the chicken for up to 8 hours; any longer and the vinegar can make it mushy. You can freeze the raw chicken in the marinade for up to 3 months, or store cooked chicken in the fridge for 7 days or in the freezer for 3 months.

Grill: Preheat the grill to medium heat, then grill the marinated chicken on both sides for 6-8 minutes, or until it reaches an internal temperature of 165°F. 

Oven: Preheat the oven to 400°F and bake the chicken for 20-25 minutes, or until it reaches an internal temperature of 165°F. 

Skillet: Cook the chicken in a large skillet over medium heat for 5-7 minutes on each side, until it reaches an internal temperature of 165°F. 

Nutrition

Calories: 267kcal | Carbohydrates: 7g | Protein: 32g | Fat: 11g | Saturated Fat: 2g | Polyunsaturated Fat: 1g | Monounsaturated Fat: 6g | Trans Fat: 0.02g | Cholesterol: 97mg | Sodium: 771mg | Potassium: 597mg | Fiber: 0.2g | Sugar: 6g | Vitamin A: 53IU | Vitamin C: 2mg | Calcium: 22mg | Iron: 1mg
Bag of raw chicken in the balsamic chicken marinade.

More Marinade Recipes

A good marinade can turn a simple meal into something amazing! It adds flavor, softens the meat, and makes it juicy and delicious. Here are some other tried and true favorites!